Category Projects

What do you do? You get the best looking ouija board I’ve ever seen and put it in the middle of our living room–explain that to me!

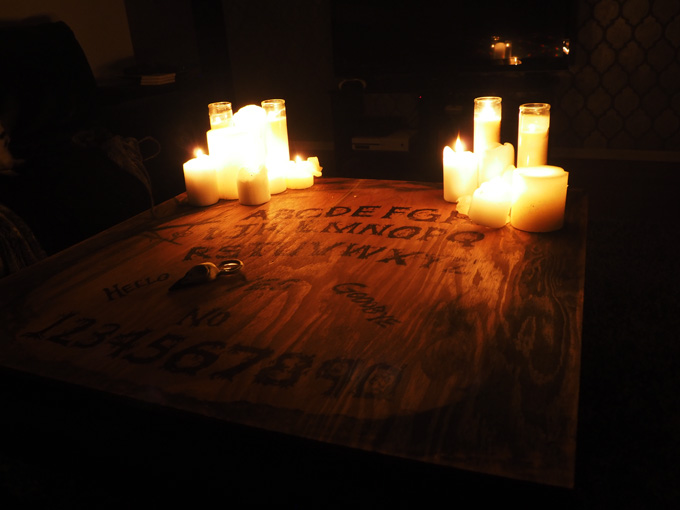
Sometimes, when you want something done right (or at least, large), you have to do it yourself. I had an Ouija board out at my last Halloween party, but it was plastic-y, cheap, and not the eye-catching spooky centerpiece that I was looking for. If I was going to turn my house into a proper Goth Downton Abbey in October, I’d need something grander.

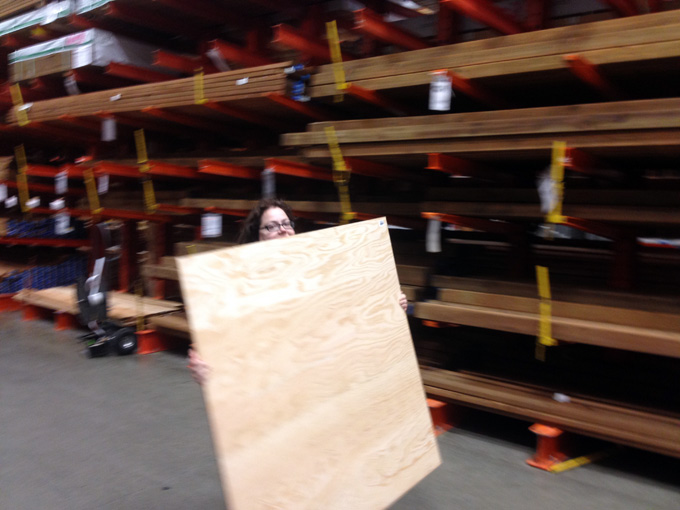
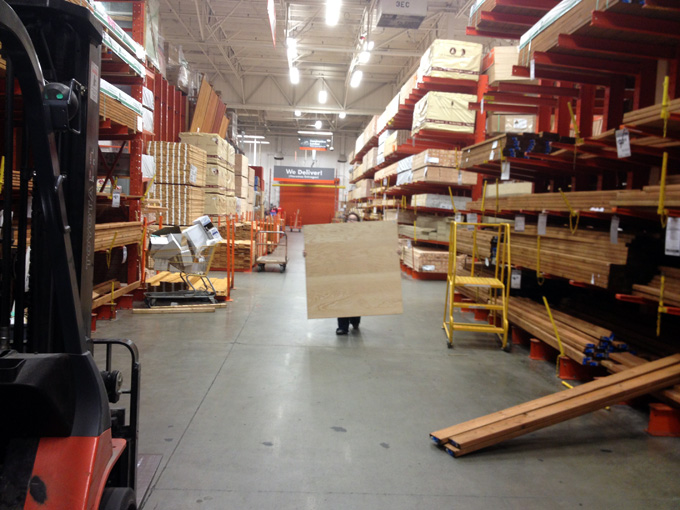
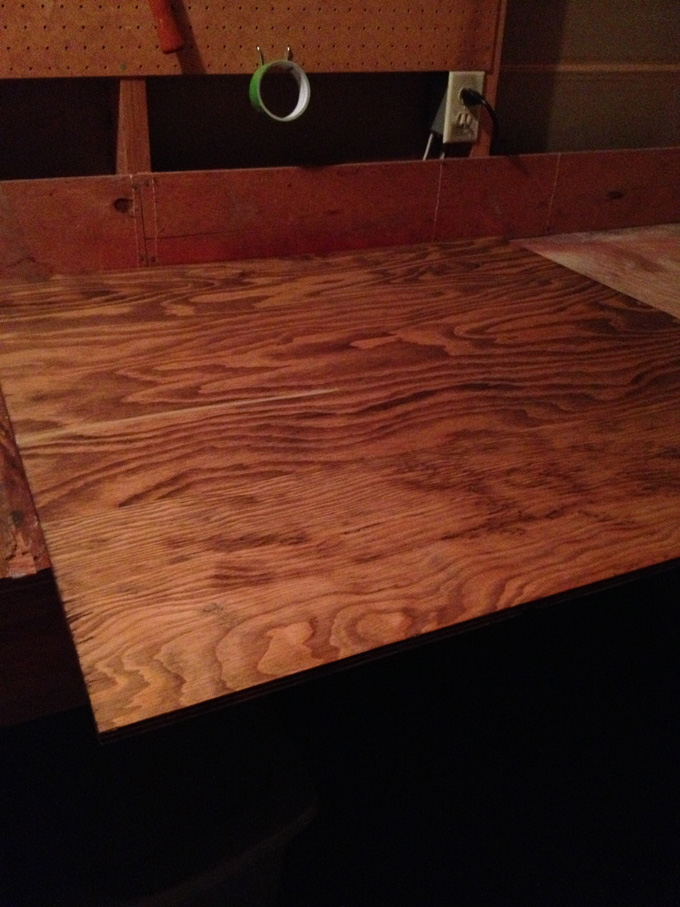
Something grander started with a big hunk of plywood at Home Depot. I took the measurements of my coffee table and had them cut the board to those dimensions. (I ended up having to wander through the store for a while looking for an employee, and as the piece of plywood was so large, it looked like I was using a clever disguise to hunt wascally wabbits.)

giant plywood

home depot camouflage

Once that sucker was cut to the proper size, I brought it home and used a woodburning tool on all of the edges so they wouldn’t be so bright–I wanted them dark enough to almost visually blend with the coffee table in dim lighting. I could have accomplished this aim in any number of ways other than woodburning: stain, paint, marker, blood of the innocent…I just chose the method that tickled my pickle at the time.

workbench

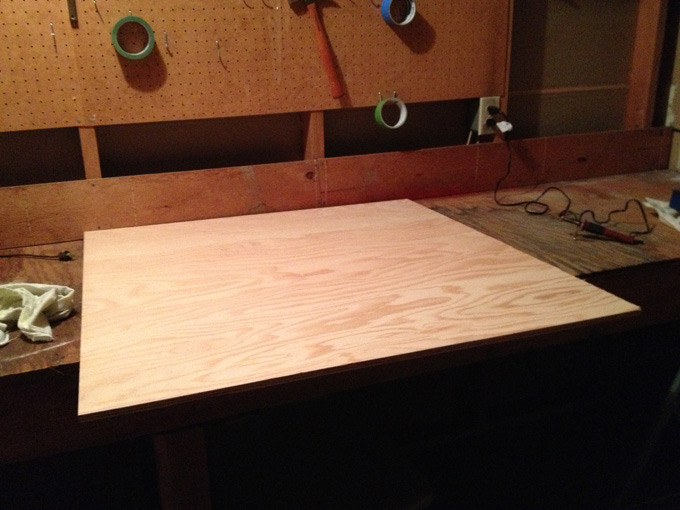
After the edges were to my liking, I put a couple of thin coats of Restor-A-Finish on top to bring out the grain and darken the wood a bit. I chose Restor-A-Finish for a couple of reasons: one, I had it on hand already so it was effectively free, and two, Restor-A-Finish has only a small amount of stain in it so I didn’t have to worry about accidentally making the wood so dark that it would compete with the lettering on top.

stained

As usual, it’s at this point in the process where I got so involved that I stopped taking pictures, because I always forget about maybe blogging the project later in the heat of the moment. But it’s not like there’s that much to it, either. I wanted the board to have a creepy woodsy theme, so I used very thinned-out black acrylic paint to wash on a couple of trees on either side of the board. Thinned out acrylic soaks into the wood much like watercolor and by layering it, I was able to get the overall effect I was looking for. I found a free font I liked on dafont and printed it out huge. Using that as a guide, I eyeballed it and penciled a larger approximation of each letter onto the board. When I was satisfied with placement, I then used a sharpie to fill them in. I went with sharpie over paint for the ease of crisp lines, a generally matte texture, not having to worry about chipping, and keeping the lettering area smooth. I have zero intention of ever using it as a functional board (I don’t believe in it and even if I did, it’s too dang big), but I wanted it to look as though it could be used as one, and letters with any amount of raising would keep the planchette from moving smoothly.

planchette

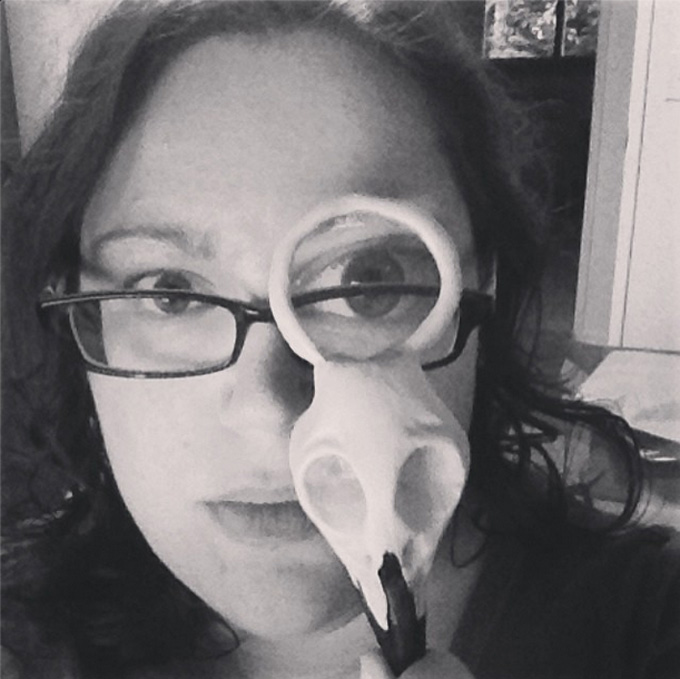
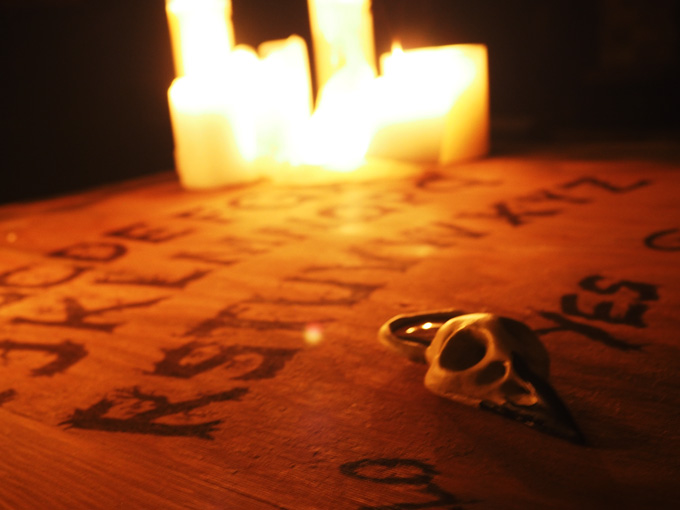
Speaking of the planchette, I decided that instead of the standard heart-shaped piece of wood, I wanted something that looked sort of like a crow skull. To make it, I used a cheap monocle I’d bought as a photo booth prop for the wedding and sculpted the skull shape using apoxie sculpt around it. I love apoxie sculpt–you mix equal parts of the putty thoroughly and you have 1-3 hours working time to get it shaped it exactly as you’d like, after which it cures hard and waterproof, able to be painted, sanded, drilled, and pretty much anything else you can imagine. I find it superior to sculpey and the like because it doesn’t need to be baked to cure and I’ve found it to be less fragile as well. The only downsides are the shorter working time and higher cost per ounce, but I’m still using the one pound pack I bought in 2010, and I’ve found that if I don’t finish a small sculpting project within a couple of hours, I won’t ever finish it, so the shorter working time actually works for me in that it keeps my butt glued to the seat and focused on what I’m doing. Once the apoxie sculpt finished curing, I painted it with some acrylic paint.

Spooky, no? If I was going to do it over, I’d use a larger magnifying glass lens instead of a monocle, and I may yet do so, if only because the magnified area is so relatively small compared to the size of the letters. But for under $12 (basically, the cost of the wood, since I had all of the other materials on hand), I definitely have something that’s much more dramatic and eye-catching than the cardboard board game!

Makin Stuff: A Harry Potter Moving Picture Frame

A while back, I participated in the Harry Potter gift exchange on reddit. I’d participated in a few other gift exchanges previously, and they were all pretty much bummers in that I’d put a lot of time and effort into picking out what I thought would be a great gift only to have the giftee not even bother to acknowledge that they’d received it. However, I felt strongly that the Harry Potter exchange would be different, more magical, both because of the subject matter and because this time I had a plan in place for what I wanted to give. Something I’d been thinking about making ever since my trip to the Islands of Adventure. Something that you couldn’t buy anywhere. No, not friendship.  A picture frame that made it look like you were on the cover of the Daily Prophet. Just in case you’d like one, here’s how I made it!

What you’ll need:

  • A digital photo frame that supports video files, with a total width of less than 8.5 inches. I used the Micca M707Z.
  • An SD card. You won’t need a huge one unless you plan to cycle through a number of videos instead of just one.
  • Basic video editing software
  • Plywood, enough for an 8.5×11 sheet plus a few more inches for the other frame components
  • paint or wood stain
  • wood glue
  • double sided tape or mod podge or your preferred adhesive
  • x-acto knife
  • basic woodcutting tools (I used a Rockwell multi-material cutting saw)
  • photo editing software
  • printer
  • a few sheets of paper


All of your measurements will be based around the dimensions of your digital photo frame, so if you’ve ordered it online, you should wait until you have it in hand to get started. For example, the photo frame I bought advertises that it has a 7 inch wide screen, when in reality, it’s just over 6 inches. That makes a big difference! Once you have your screen measurements in hand, you can proceed.

I did the newspaper portion of the project first. I used photoshop, but you can use any photo editing software you have. I’m sure if you were tenacious enough, you could lay everything out in Word! Choose any number of the free Harry Potter-inspired fonts on fontspace, and plot out your “articles” in a manner that’s pleasing to you. They can be literally about anything you want: a wizard fashion show, a holiday, a special occasion, anything. It will look more like the movie newspaper if you mix fonts and include snippets of multiple stories rather than just one, but it’s really up to you. The only thing you need to work around is a rectangle of blank space exactly the size of your digital frame’s screen dimensions somewhere on the page. This rectangle also shouldn’t butt up to any of the edges: leave enough room for the frame part of your digital frame to hide so it’s not sticking out anywhere.

daily-prophet

Print out a copy to make sure you’re happy with it. Cut out the blank area with an x-acto knife and use this printout as a template with which to trace onto your plywood. Once all of your lines are traced, you can start making your cuts. When you’re finished, you should have an 8.5×11 piece of wood with a hole the size of your screen cut into it. Now while you CAN do all of the woodcutting with a dremel, here’s why I don’t recommend it:

dremel-vs-proper-tool

That one on the left? I used a Dremel and it took about a year to cut just to get it to that level of shittiness. Once I broke down and bought a proper tool, I cranked out the considerably less shitty one on the right in less than five minutes. You’re also less likely to be injured when using a tool in the way it’s intended instead of forcing a diamond bit through a sheet of plywood like I did. As with all power tools, use proper safety equipment, and read all instruction manuals before operating any tool you’re unfamiliar with!

At this point, you can paint or stain the back and sides, or you can wait until you have all of the wood components completed. It’s your choice! You don’t even have to do anything to the wood if you don’t want, but I feel like painting or staining it black allows the back and sides to recede so the focus is on the front, where it should be.

Now, you could just glue your digital photo frame to the back of this piece of wood and be almost done (and if you’d rather do that, you should definitely paint/stain first), but I wanted to make the photo frame removable for a couple of reasons: (1) so if it ever dies, it can be replaced and (2) if I decide I don’t want something Harry Potter related on display in my house anymore, I can always slide out the digital frame and use it by itself.

Here’s where my instructions get a bit dodgy if you’re using a different make/model of digital frame. My frame’s power cord and SD slots are all on one side–the left side, if you’re looking at the back. Thus, I wanted to keep that side open for easy access to the SD card. On the right side, however, I cut a small strip of wood (5.5″ long, .5″ wide) to serve as a stopper, so the digital frame has something to butt up against and keep it from sliding out of the side. I then measured the depth of the digital frame and cut two pieces of wood that would be glued together to give the digital frame a place to sit and would also hold it in place. My pieces were both 6″ long and 1.25″wide. At its deepest, my frame is just over an inch thick. My plywood was .25″ thick. By gluing the plywood together in an L shape, I was able to create a support that was just a hair over an inch think which enables me to seat the digital frame in snugly, which means it doesn’t need any support on the top of the frame to hold it in place.  Depending on the depth of your frame, yours may be different.  Use wood glue to glue the narrow strip of wood to the back side of your 8.5″x11″ piece of wood, on the opposite side of wherever your SD card inserts. Glue your two supporting pieces of wood into an L shape. Let dry.

gluing-supportsThere is literally no reason for the clamp to be in this picture. I didn’t use a clamp. Ignore the clamp, is what I’m saying.

Once your L shape has dried, use more wood glue to glue it in place on the back of your large sheet of wood. Let dry.

back-side-support-wood

Once all of the wood glue on the back of your frame has completely dried, try sliding in your digital frame. It should fit snugly. If it doesn’t, you’ll need to figure out what went wrong–this may involve swearing. Once it does fit snugly, cut one more piece of wood to serve as your stand. Mine’s 2.25″ wide by 5.25″ long–yours may be different. Just cut something long enough that when propped at an angle, it will be able to keep the frame upright of its own accord. Once you’ve got that piece, glue it liberally into place and let it dry.

gluing-the-stand

If you haven’t painted or stained the back and all of the various bits of wood, now is the time to do so. Let dry completely. If you used stain, you may want to lightly sand any drips or spots that you may have gotten on the front of the wood, as otherwise, it can show through your paper.

Once it’s fully dry, you can affix your “daily prophet” to the front. Either use the one you printed off as a template if it’s not damaged, or print a fresh one. I used double sided tape to attach mine to prevent any ink bleeding from getting the paper damp, but you can use whatever you like. I didn’t want to mod podge the front to seal it, again, as I was concerned about bleeding ink and also because I wanted it to have the matte look of a newspaper. If you’d prefer yours to be sealed or shiny, by all means, go for it.

After your frame is done, all that’s left to do is to follow the instructions on photojojo to make your moving picture, and you’re done! Tell your friends, or let them think they’re going crazy when they think they see a picture wink at them the next time they’re over at your place. Either way, have fun and enjoy having just a bit more magic in your everyday life!

harry-potter-moving-picture-frame

 I’m confused, this one says “wizard” and the one up top says “wizards”. Good catch! I made one for myself as well, the one above is the one I mailed out on the exchange. And he LOVED it.


Correction: I don’t like your girly weeds

Our house came with a giant cement slab in the backyard, indicated in the listing as RV parking. As we have no intention of ever purchasing an RV,  and it’s actually one of the best areas in the yard in terms of sunlight, I decided the best use of the area would be to set up a container garden. Not the mishmash of pots we had at the rental house, but essentially large raised beds, only on concrete instead of more soil.

I’ve learned a few things during this endeavor:

  1. Lumber is expensive. Like, really expensive. I thought the saying “grows on trees” was devised to describe something that was plentiful and cheap, as opposed to the things which do NOT grow on trees, but apparently I was mistaken.
  2. The phrase “dirt cheap” is also a little misleading.
  3. My spatial visualization skills are poor to nonexistent.

First things first, we needed to buy some lumber. The best stuff to use is untreated cedar. However, when the dude at the lumberyard told us our grand total, I decided that pressure-treated wood probably wouldn’t cause me to sprout a third arm. Once the wood was delivered and assembled to our liking (we decided to go with two taller beds rather than four shorter ones to give plant root systems plenty of space to spread out), it was time to order some dirt and some rocks for drainage.

The company we ordered our dirt from had a split-load fee, but more than that, they required that each item type you order be a minimum of two yards, which was much more than we needed. That’s silly, I thought. There’s a materials yard not far from the house, so I’ll have the dirt delivered, but I’ll haul home the rocks myself.

The soil was set to deliver on Saturday, so I needed to pick up the rocks on Friday so I’d be home for the soil delivery the next day. I drove off to the materials yard in our dainty Saturn SL2 with one of those plastic storage bins, a couple of home depot buckets, and a couple of heftier plant pots, just in case. It wouldn’t be that many rocks, after all.

When I told the woman at the counter that I wanted to buy a yard of rocks, she looked at me, looked at the car, looked at me again, and asked if that’s what I planned to haul it in. “You don’t have a friend with a truck? Home Depot rents trucks, you know.” “I know, but I think it will be fine. Look, I brought a storage bin and some buckets.” “Well….under the circumstances, how about I sell you a half yard for now and you can see if you want more later?”

I said that would be fine, and she sent me down to the rock area to wait for the guy with the loader. When he arrived and scooped an entirely full bucket and asked me to set my bins down in front of it so he could “pour it in” and save me some work, I began to realize I had made a mistake. My buckets filled almost immediately and the rocks kept coming and coming and coming. A half yard of rocks was a lot more than I’d envisioned. Then I discovered that the storage bin was so heavy that I couldn’t budge it so much as an inch, not even pushing against it with all of my body weight. There was simply no way I was going to be able to lift it into the car. The loader operator asked if maybe I’d rather have the rocks delivered instead, and that sounded like a good idea to me, but when I found out that it would cost six times more than what I had paid for the rocks to have them delivered, I decided that I’d made my rocky bed and I needed to lie in it. I rolled up my sleeves, asked if it was ok if I made a few trips, and got to work.

10250045_10152107322113940_3356466683530263590_n

It took me six trips to get all of the rocks home. Six trips. I don’t think they expected me to keep coming back after trip two. By the time trip six rolled around, I was so bright red from my exertions that one of the employees helped me load the last of it into the car because I think he was afraid I might burst a vessel and die on their property. The important part is that I did manage to get it all home so I’d be ready for the dirt delivery the next day.

Ah yes, the dirt delivery. I took measurements and calculated how many yards we needed to order and confirmed these measurements and calculations with the soil company, so I cannot even begin to explain how we ended up with so much extra soil.

10156125_10152108862193940_7262591148502042693_nFrom this angle, it doesn’t look like that much.

10259914_10152108862098940_6698304441558772917_nThis angle tells the story better.

We have literally twice as much dirt as we needed to fill the beds. I’ve filled the beds, some containers, spread some out on the landscaping, and we still have an enormous dirt pile covered with a blue tarp in the backyard that sort of looks like we might be hiding a body. Or twenty. Just a big ol’ corpse pile, hanging out. Eventually I plan on building a strawberry tower, which will help use some of the dirt, but it looks like Mellzah’s Folly (yes, the dirt pile has a name) will be around for some time yet. The smaller rock pile, Mellzah’s Folly Jr, will be keeping it company.

OLYMPUS DIGITAL CAMERA

The plants are loving it, though, and I’m loving having a happy garden. Plus this third arm is really coming in handy!